Here we'll share some guides, useful tips, and information about fitting the products, product use and so on.
If you have questions or comments about using your product or require assistance and can't find the relevant info here, we encourage you to Contact Us.
Weathershields Installation Instructions:
When you get your product, the installation guide will be supplied with your order. For proper installation and best possible fit, please read all instructions BEFORE you begin.
You may also want to check this video showing the fitting process.
CAUTION: - Before driving, ensure that the weathershields are properly secured to vehicle
- Do not use automatic "brush style" car wash
- Do not use cleaning solvents of any kind
- From time to time, check all components for tightness
PREPARATION: - A trial fit is recommended to ensure proper positioning and fit
- Check fit of parts before sticking them on as we will not accept the return of used parts
- Wash your vehicle to remove any debris or dirt, dry with a clean towel
Follow the below steps to fit the weathershields:
- Clean the the door frames where the weathershields will attach using a clean cloth and alcohol based surface cleaner or alcohol based cleaning wipes. All dirt, dust, or grease must be completely removed from the surface to ensure that the adhesive would attach properly.
- Position the front deflector on the upper frame of your car's door to make sure that it fits properly, if necessary mark the right position (depending upon car make or model, deflectors may be attached on the door frame closer to the upper edge of the frame or on the inner part closer to the window glass).
- Peel back 2-3cm of the tape liner off the adhesive tape on both the front and the rear flanges of the front deflector. Attach front and rear ends of the deflector on the door frame. Go through Steps 2 and 3 for the rear deflector on the same side.
- Make sure that both parts are positioned well and on the same level one with the other. After that pull at the free ends of the tape liner to remove it completely, at the same time applying pressure on the deflector to fit it. Make sure you apply enough pressure along the whole length of the deflector and press harder at the ends to secure it. Pressing force at this stage will ensure adhesive efficiency.
Install deflectors on the other side as per Steps 1 to 4.
For the best result please do the installation work in warm and dry conditions. Do not use car polish, abrasive agents, or solvents of any kind.
Adhesive efficiency will improve over time, the final result will be achieved within 72 hours.
If deflectors need to be uninstalled, adhesive tape can be removed without damaging the painted surface.
Bonnet Protector Installation Instructions:
Below example is for bonnet protector to be fitted on Subaru Forester SH model. Install process may slighly differ depending upon model, for correct information please refer to the install guide that was supplied with your item.
If you have questions about fitment on your specific model, please contact us.
BEFORE INSTALL: Open the bonnet. Make sure the bonnet is clean and dry, if required wipe it with a damp sponge prior to installing the deflector. Unpack the bonnet protector, remove the wrapping film, inspect the item, check that all accessories listed are supplied.

1. Position the deflector on the bonnet, identify the 6 spots where the brackets should be attached, match the brackets with the screw holes on the deflector.

2. On the under side of the bonnet, insert the plastic screw holders into the holes as shown in your guide.
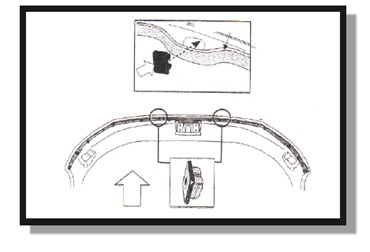
3. Use the prep wipe supplied with your set to clean the surface of the bonnet where the brackets will be attached (refer to Step 1 where you have identified the positioning for each bracket), and apply the protective sticky tape there, in order to prevent brackets from rubbing on the paint as well as to secure the hold. The sticky tape should cover the top and go under bonnet, thus wrapping the front end of the bonnet where the brackets will be sitting.
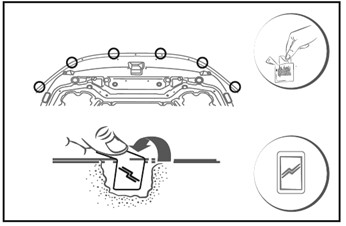
4. Attach the 2 brackets, fix with the screws into the screw holders that were fitted in Step 2.
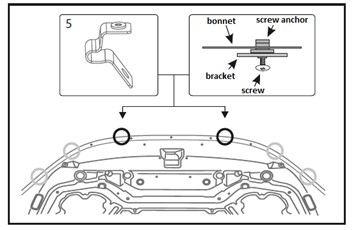
5. Attach the remaining 4 brackets.
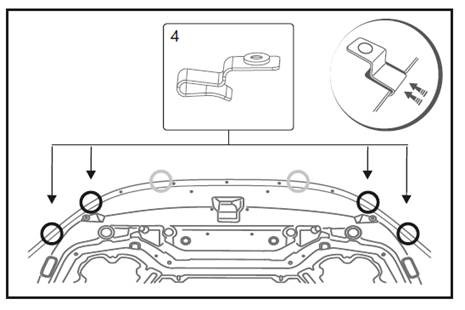
6. Mount the deflector, secure it with screws to the brackets.
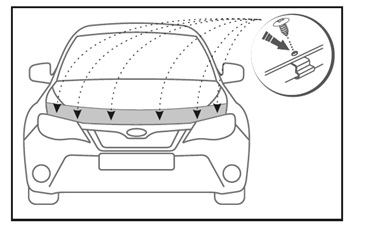
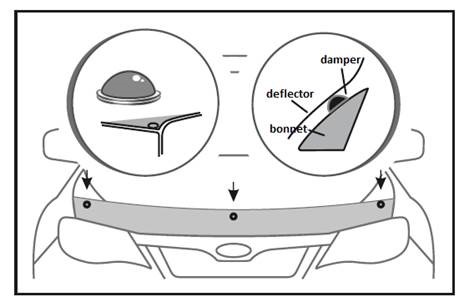
7. Apply the silicon dampers on the bonnet, under the deflector (flat side sticking to the bonnet, make sure you wipe the surface with an alcohol based cleaning solution or a prep wipe before sticking, to ensure proper adhesion).
